Featured post

Pentewan Light Railway

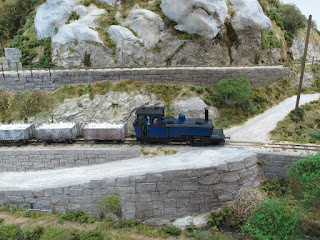
The Pentewan Railway in Cornwall was possibly unique in having three* gauges in its lifetime. Christopher Hawkins built the original rai...

Monday 4 November 2024

Simple DC Controller

I only have two standard gauge locos at the moment - a GWR 55xx prairie which is so far just a rolling chassis and also a Heljan Class 42 Warship. Both of these are still DC but will be converted to DCC in due course. The Warship takes quite a lot of power - and the little old Gauge Master DC controller borrowed from my son's trainset would frequently cut out. 

I didn't want to splash out on a high-power DC controller, so though I'd try one of the cheap PWM motor controllers that are now readily available - I think driven by the rise in e-bikes etc. I bought this one which was a 20A 25KHZ PWM DC Motor Controller which cost a mere £17.99 from eBay:

I hooked it up to a 16v DC old laptop power supply that I also use for my NCE ProCab and tried it out. It works a treat. There doesn't seem to be any noticeable buzz etc from the locos and I think it will certainly serve well while I'm completing the SG.


Tuesday 30 April 2024

Traverser installation

 The traverser has returned from its travels. I built it for O14 at ExPong 2014 and then gave it to David J as I had no use for it. He's had two house moves and now didn't need it, and as I could use it in the new config it has come to Devon.

It will be adapted to have two mixed gauge tracks. I've nearly finished the two curved spline roadbeds for SG and NG which connect to the traverser. The NG has a tight curve and ducks under the SG.


Tuesday 9 May 2023

More Progress

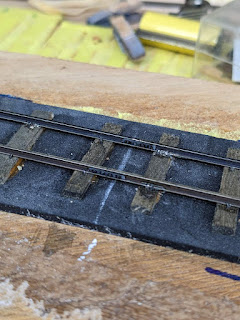
The new board is ready and I'm now laying track. This time I've used dark gray EVA foam as an underlay rather than the hideous yellow stuff of old. Of course being so dark meant I had to use a white crayon to mark the centre lines and sleeper posistions. Previously I pre-stained the cut sleepers but this time I glued them down as bare wood and then painted them - with a dilute mix of black and burnt umber acrylic inks.

Track laying then progressed using my standard method with staple spikes and cosmetic fishplates etc.


I've decided to change my approach to ballast. Previously I used crushed cat litter and chinchilla dust glued down with dilute Copydex, however this has proved to very durable. I'm now trying crushed walnut shells in various grades.

Three grades of crushed walnut shells, grey dye and liquid latex

I wanted the ballast to be a light grey like the crushed cat litter (the PLR used a lot of clay-tip waste) but the dye didn't really work. I then retired an old kitchen mixer and added slightly diluted matt paint (old white primer slightly darkened with some black) whilst it was running. Then turned it out onto a cloth to dry. It has worked rather well.

The first batch (medium grade) is in the bag and the coarse and fine grades are drying

Once the track laying is complete I'm going to refresh any loose ballast on all of the older boards and get it wired up ready for operation.

Saturday 11 February 2023

A Selection of shots

 Here is a selection of shots taken before the move.

Ex L&B Manning Wardle hauls clay up to the exchange sidings

This originally had model track but it got removed about 20years ago after a change of plan. 

A down train passing the quarry.

And further down the line crossing the quarry road.

A up works train hauled by K1 (This was sold to the PLR by Beyer Peacock after repatriation and when the PLR finally closed in the 1960s it went to the NRM)

Saturday 4 February 2023

Progress at last in the new home

When the loft was completed last year it was far too hot to do anything apart from get the boards up there. I spent a long time trying to work out the optimum config. It was clear the two main sections would need to be separated and came up with a design that I thought would work but would have involved a lot of extra hidden track. I built the staging for the spiral/quarry and then realised it wouldn't work so decided to rotate it 90degrees. With temporary extra bracing added I slowly shoved it round from underneath. I got it about half way round and realised that was a far better position. 

With a little bit of shifting to-and-fro I've now completed the staging for the exchange sidings and positioned all the current boards. There will be one new board required  of about 5ft long which needs to accommodate a  6 inch change of datum level (I'm used to doing that). Track will be laid on raised trackbeds built the J H Ahern way (still be best book I've got).

The fiddle yard will be beyond the lower tunnel in a similar config as in the last house. The traverser built for ExPong is going to come to Devon too now David J no longer needs it. There is even the potential to join it up to get a continuous run of close on 90ft and then simply watch the trains go round. The grandchildren may get to race their engines (which I've promised to build).

Some photos from today:

Note the gap for the new board in the background.

The fiddle yard will be behind me. 


Monday 11 January 2021

On the move

 The crates have gone into the lorry today. It may be some time before I see them again as we still haven't exchanged on our Teignmouth house.


Wednesday 6 January 2021

PLR Ready for transit

It took several days to separate all the boards and get them downstairs and then dismantle and clear all the staging and workbench etc. Here are some photos of the progress.

All the boards downstairs into the conservatory:


Notice the odd shapes and height of some of the boards - this is certainly not a railway built on a flat piece of board!

Crated up ready for transit:


There are 4 crates each with several boards within made using the wood from the loft staging and with the high hill as a separate piece. The crates are designed to be carried by two people and stack for transit. I've used pallet cling wrap on the scenic boards to keep them clean as they could be stored for some months before the new log cabin home is built. The removal people frowned when they saw it all (they had been warned).

The clear loft:


What a nice railway room it would make! However, I don't think the new owners are that minded. This room was actually one of the reasons we (well me) wanted to buy the house all those years ago. It didn't have the floor boards nor insulation then. Note the water tank that dictated the big hill and the track spiral which tunnelled down behind it.

So Devon next!

Saturday 28 November 2020

PLR on the move

So the time has come to consider how to get the PLR out of the loft and crated up ready for the move to Devon. Here are some pics of it in the loft before dismantling it and getting the boards downstairs for packing - and the rest of 30 years worth of accumulated rubbish treasures. My plan is to assemble the boards with added wooden framing to make 3 or 4 crates.


Friday 11 January 2019

K1 rechip

After a lot of deliberation I have taken the plunge to replace the CT Elektronik decoders on my K1 with a Zimo MX645 for the front LP engine and a MX633 for the rear HP engine.

Although it is a heavy engine with common pickup on all 8 wheels it still suffered a little from power dropouts which mainly manifested itself in spluttery sound. Therefore the rebuild includes adding stayalives in the form of a bank of 4 x 220uf tantalum capacitors per engine.

I stripped out the memory wire rigging that operated the valve gear (forward/reverse) as it never really worked satisfactorily. However I still have a hankering to make this work so have acquired two of these tiny servos:
Specification:
Weight: 1.7g
Speed: 0.07sec 60deg @ 2.8v / 0.05sec 60deg @4.2v
Torque: 0.05kg @ 2.8v / 0.075kg @ 4.2v
Dead Band: <4us
Dimensions: 13 x 16 x 6mm
Plug: Micro JST - 1.25 Pitch
I've worked out that these could just fit alongside the motor in the location shown in the photo below. Don't forget this is all hidden inside the tanks - the motor, decoder and wiring only just fit as it is!

However, before I try fitting it I'm going to hook it up to the decoder and work out what settings allow the servo to move with direction. One problem is only the MX645 has the 5V supply necessary to drive these servos without extra circuitry (for which I have no space) so if successful I will probably drive the rear engine servo from the front using some spare wiring connections in the steam pipe.

There is also still the hope to add automated uncoupling using tiny RC actuators for which there is even less space for, although at least the memory wire is no longer in the way.


Update 16th Jan - I've now temporarily hooked up the servo to the +5v supply on the MX645 (soldered to a capacitor as per instructions!) and activated the servo CVs with DecoderPro and it works! I've now want to work out how to make it directional. More manual gleaning and chatting to friends methinks.

Belated update August 2019 - I came to the conclusion a few months back that it was not realistic to get the servos and operating linkage in place without complete disassembly of the engine units. In practice this would be complete breakdown of everything back to component parts of: wheels, motion, axleboxes, etc., and then build them again with some operating linkage in place. As it took me 4 1/2 years to build it in the first place, and I still have lots of other locos and track etc. to build, I decided I would abandon the operation. Thus it was reassembled, and the painting touched up and re-weathered and it is now ready for operation again. 

Postscript May 2020 - Operation of the re-chipped K1 proved problematic. The Zimo chips come with immersive drive which means you control the braking with F2. Well that's the theory but the MX633 had an older firmware version so didn't seem to have the immersive drive. Furthermore, it appeared the immersive drive on the MX645 only worked in one direction. Thus the engines were dismantled once again and the chips returned to the supplier for a firmware upgrade. For various reasons I am still awaiting their return.

Friday 28 April 2017

Now here's a trackwork challenge

As blog readers will know I like track - narrow gauge, broad gauge, chaired, flat bottom and even trams. Thus I was in seventh heaven with a holiday in Lisbon over Easter where the narrow gauge tram system with both old and new styles of trams exhibit every classic type of track formation and runs up and down unbelievable gradients - one tram had to apply it's skid brakes before descending a hill.

I modelled trams in my youth and could be tempted again one day to try and replicate the type of scenes below.